Generic REST API
Canvas offers a generic REST API app, which will allow you to make requests to a custom REST API without the need for pre-existing support and a dedicated app on Canvas.
To make the API calls via the REST app you will need to write some code - to define a request object (as shown below), and POST the request via the rest/request endpoint.
In general we recommend that you use dedicated apps instead of the generic REST app if the API you are connecting to is already supported on Canvas with a dedicated app. Canvas has built-in support for a wide range of apps, with ready-made blocks and simplified APIs. We are also continuously adding new apps and extending our library of blocks. If you are not able to find a specific app or block you may request it from us, so feel free to get in touch.
Adding the REST app
The generic REST API app can be found in the app list, with the other supported apps:
The following fields need to be filled out for authentication:
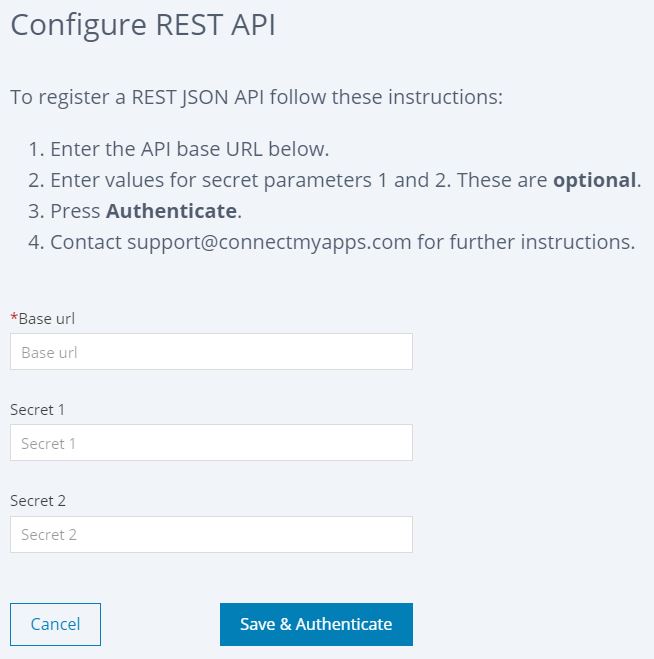
The "secret 1" and "secret 2" fields on the app config page are simply used for secure storage of sensitive keys or tokens. You should never hardcode keys or tokens into your block code. Instead use these fields and fetch your secrets at runtime in your code using:
await api.get('rest/secrets')
Making REST requests
After registering the REST app on your account you can either create a new workflow with it, or add the REST app to an existing workflow. (To add the REST app to an existing workflow, go to the workflow editor page, and click the gear icon ⚙️ to see the workflow settings. Then under "Workflow applications", search for your REST app under "Add application", and then click "Add").
You will then see REST request blocks available as an option for use in the workflow:

You may also construct your own request in custom code blocks, as shown in the examples below.
Examples
GET request example
// Create a GET request to get an existing employee
let request = {
    "verb": "GET",
    "requestUrl": "employee?id=" + 1234,
    "parseResponse": true,
    "responseCodes": [200, 404],
}

// Set the Authorization header using the secrets from the registered REST app
const secrets = await api.get('rest/secrets'); // Fetch and decrypt credentials
request.headers = [{ key: "Authorization", value: secrets.secret1 }]; //'secrets1' is the first secrets field

// Send the request
let response = await api.post('rest/Request', request);

return response.jsonBody;
Note that even though the outgoing request to the external API in the example above is a GET request, the request object data itself is first POST'ed to Canvas' backend, via api.post().
So, your REST calls will always use api.post(url, request), not api.get(url, request)
POST request example
// Create a POST request object for creating a new employee
let request = {
    "verb": "POST",
    "requestUrl": "createEmployee",
    "parseResponse": true,
    "responseCodes": [200, 404],
    "data": { firstName: "Jane", lastName: "Doe", empNo: 1234 }
}

// Set the Authorization header using the secrets from the registered REST app
const secrets = await api.get('rest/secrets'); // Fetch and decrypt credentials
request.headers = [{ key: "Authorization", value: secrets.secret1 }]; //'secrets1' is the first secrets field

// Send the request
let response = await api.post('rest/Request', request);

return response.jsonBody;
If no “Content-Type” header is provided in the request, the backend will set it by default to “application/json”, except for GET requests which will instead have an “Accept” header set to “application/json” by default.
If you are using header “Content-Type” set to "application/x-www-form-urlencoded" then the “data” field can be used to send the parameters. The entries in “data” are expected to have “Name” and “Value” fields, which will be used to set the parameters for the outgoing request.
Full list of available fields for the request object:
    let request = {
      "verb": "POST", //currently supported HTTP verbs are GET, POST, PUT, PATCH, and DELETE
      "requestUrl": "/myendpoint" //only the last part (i.e. the endpoint) is needed here, as the base url comes from the app you registered
      "parseResponse": true, //try to automatically parse the response as json, xml, or csv
      "responseCodes": [200], //expected response codes, which will not trigger an exception
      "headers": [
          { "key" : "Accept", "value" : "application/json" },
          { "key" : "Content-Type", "value" : "application/vnd.api+json" }],
      "cookies": [
          { "key" : "CookieName1", "value" : "CookieValue1" },
          { "key" : "CookieName2", "value" : "CookieValue2" }],
      "data": {"myField": myValue }, //the data to send, as request body
      "csvHeaders": false,
      "csvSeparator": ";",
      "csvResponse": false,
      "removeXMLBOM": false,
      "returnCookies": false, //include the cookie in the response
      "encoding": "UTF8",
      "baseURL": //not in use, as the base URL comes from the stored app credentials
      "successCode": 200
    }
Parameters for the ‘rest/request’ endpoint:
await api.post('rest/request', request, trustCertificate, isoFormatJsonDates)
- “request” is the request object, as described above
- “trustCertificate” is a boolean which can be used to ignore SSL certificate errors. Defaults to false.
- “isoFormatJsonDates” is a boolean which can be used to ensure that date formatted strings are not parsed to a date type, but are instead read as strings. Defaults to true.